


If you have been a WordPress user for a while, before WordPress 3 was released, and have been working on creating or using custom themes you might perhaps be aware of just how complicated it was to customize the menu. Certain changes had to be hand coded into the header.php file. Thanks to this limitation features were a bit restricted and it took some special coding skills to make something really good of the menu. Well, all that is now in the past. With version 3 WordPress has revamped the menu system. Now you can do a lot more and do it with a lot more ease. You can, for example, rearrange your menu with a simple drag and drop. Let’s look at how to do this and much more.
Enabling the WordPress 3.0 Custom Menu
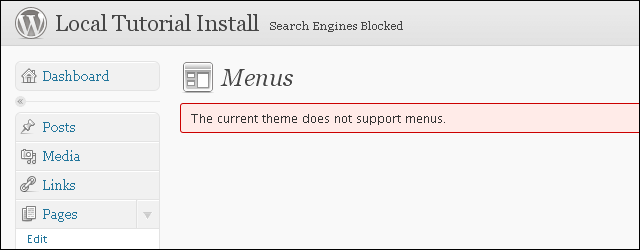
I’ll assume that you are already using WordPress 3.0 or better. If you are using the default Twenty Ten theme you do not have to perform the following steps. This theme already comes with the custom menu system enabled. As time goes many themes will also enable the custom menu feature. To check if your current theme supports custom menus go to Appearance -> Menus in the WordPress admin panel. If your theme doesn’t support this feature you will see a message telling you that your “current theme does not natively support menus, but you can use the Custom Menu widget to add any menus you create here to the theme’s sidebar”. What this means is that although the theme does not natively support this feature, you can make it work with a couple of little code changes to your theme files.
To make the first change open the functions.php file from your theme in your favorite text editor and add the following lines:
add_action(‘init’, ‘register_custom_menu’);
function register_custom_menu() {
register_nav_menu(‘custom_menu’, __(‘Custom Menu’));
}
Here we are registering a new navigation menu using the “register_nav_menu” function and defining a couple of parameters for it. The second change to be made will tell WordPress where to place the new menu. This will be defined in the header.php file. So open the file and add the following code.
<?php wp_nav_menu(array(‘menu’ => ‘custom_menu’)); ?>
The placement of this line can be a bit tricky, as it will depend upon the them you are using. Play with a few options until you get it right.
Next, you need to add an item to your menu. Add the following below the previous section.
<div>
<ul>
<li><a href=”http://www.example.net” title=”Example Item”>Example Item</a></li>
</ul>
</div>
Save the changes and take a look at the front end of your website. You should be able to see the new menu with the item “Example Item” up there somewhere. Adjust the location of the menu to your taste and the theme’s requirement. Similarly you can add more items to your menu. You need not just add links to external sites, you can even add links to internal pages if you like. You can read more about this function at the WordPress Codex.
NOTE: Although it is possible to add the custom menu to themes that do not support it by default, as we just saw in the section above, I would highly recommend that you consider using a theme that does support this feature. The ease of implementation of custom menus is significantly more in the themes that support this feature, and it also makes things much easier to manage in the future, with no code changes required.
Adding a WordPress 3 Custom Menu the Easy Way
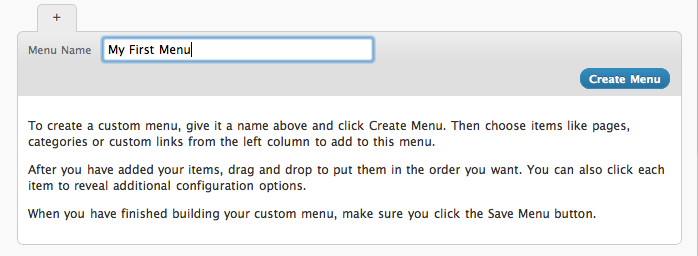
If you are using a theme that already supports the WordPress 3 Custom Menu feature adding a menu of your own is a piece of cake. Use the default Twenty Ten theme, for example. This theme supports the new menu system out of the box. Get into the administration dashboard in your WordPress 3 setup and head to Appearance -> Menus section. Now you will need to create a new menu. Enter a name for the menu you want to create, something like “My First Menu”. Then click on the “Create Menu” button to create the menu. There are three ways in which you can add items to your menu. Let’s take a look at each one individually.
Create Custom Links to URLs Using Custom Links Pane
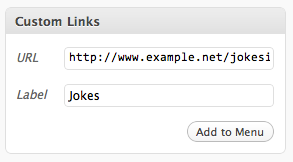
You can create links to URLs using the Custom Links pane. There are two fields you need to enter for this – a URL and a name for the menu item. The URL can be that of an external website or an internal link. Enter something like “http://www.example.net/jokesite.php” in the first field. Then assign a name for the menu item, something like “Jokes”. Once you are done click on the button “Add to Menu” to finish up. The menu item will show up in the new menu that you created in the previous step.
WordPress 3 Menu Item: Pages
The next type of menu item you can add are Pages. You can create a link to pages that you have created in your WordPress setup. This pane will display a list of all the available pages. Use the search feature if you have a lot of pages and need help finding the right one. Select the pages you want in your menu and click the “Add to Menu” to finish up.
WordPress 3 Menu Item: Categories
Another thing that you can add to your menu are Categories. In this pane you will see a list of all the categories that you have created in your WordPress installation. You can select one or more categories and have it made available to you directly in the menu. Select the categories you want and click on “Add to Menu” to add that category to your new menu.
Menu Item Placement
Once you are done adding items to your new menu you will find them listed in the custom menu pane to the right of your screen. You can drag and move them to change the order in which they are displayed. Make sure that you hit the “Save Menu” button so that the changes you make a saved. Now you should be able to view the new menu in your WordPress front end.
Locations for WordPress 3 Themes
This is a pane in the menu admin page. This will display a list of locations where you can place your menu. The number of options depends on what is supported by your theme. Pick one option and hit Save.
Conclusion
This tutorial has provided you with the basics for setting up your own custom menus. In our next tutorial we will delve even further into custom menus for WordPress 3–stay tuned!
