Developing Angular 2 Apps In Eclipse
Now that Google has released version 2 of their popular front-end Web application development framework, there has never been a better time to start learning how to use it. Along with many new features, Angular 2 incorporates many changes that developers have been asking for. With all this going for it, IDEs (Integrated Development Environments) have been quick to incorporate support for Angular development. In today’s tutorial, we’ll learn how to create a node.js-driven web app in Eclipse.
Choosing an IDE
Eclipse doesn’t currently rank as the “best” IDE to develop on Angular 2 – that honor would likely go to either Visual Studio code or WebStorm – but there are still some very good reasons for recommending it:
- many developers use it and are intimately familiar with its interface
- it’s free! (although so is Visual Studio code)
- it’s probably the most versatile IDE around
- there are always new plugins being introduced for a myriad of languages and frameworks
Installing Nodeclipse
On the subject of Eclipse plugins, the one that we’ll be using in today’s tutorial is Nodeclipse. While not a full-fledged Angular 2 development platform, Nodeclipse is development environment tool for node.js applications. Node.js will provide the JavaScript runtime environment, server, and package management via npm.
I’m assuming that you’ve already got Eclipse. If not, you can download Eclipse for Java EE Developers here.
To install Nodeclipse:
- Select Help > Install New Software… from the main menu.
- On the Install dialog, add the ” http://www.nodeclipse.org/updates/” URL to your Eclipse Software Download Sites:
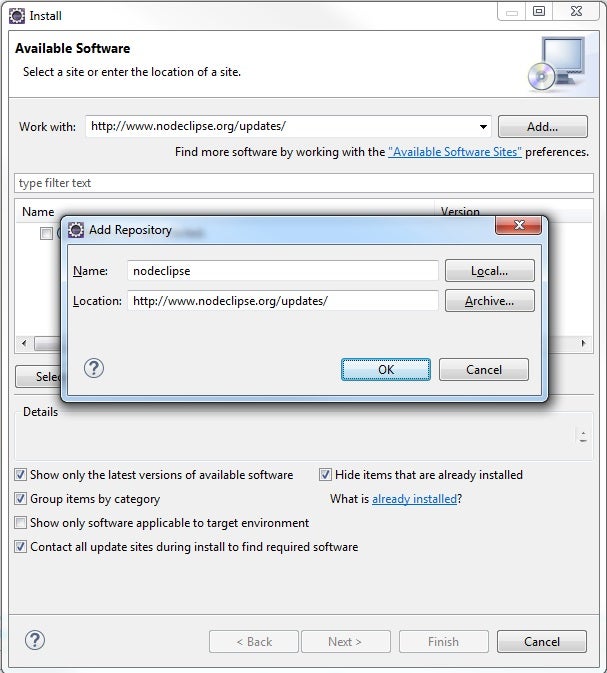
- The plugin is broken up into numerous packages. Click the Select All button to check all of the boxes and click Next to proceed.
- Once all of the packages have been downloaded, click Finish to close the dialog.
- You’ll have to restart Eclipse before using the plugin.
Create the Project
- Create a New Node.js Project.
- On the New Node.js Project dialog, enter “MyFirstAngular2App” in the Name field and accept all of the defaults.
- Locate your new project in the Project Explorer.
- Right-click the project and select New > Other… from the popup menu.
- On the New Wizard dialog, type “json” into the filter box and select “JSON File” from he list.
- Click Next.
- Name your file “package.json” and click Finish.
Package.json is a special npm file that holds project metadata as well as directives for handling project dependencies. One of the files that we will be downloading is the Angular 2 library.
- Paste the following json-formatted text inside the file and save it:
{
  "name": "angular2",
  "version": "1.0.0",
  "scripts": {
    "start": "npm run lite",
    "lite": "lite-server"
  },
  "license": "ISC",
  "dependencies": {
    "angular2": "2.0.0-beta.2",
    "systemjs": "0.19.6",
    "es6-promise": "^3.0.2",
    "es6-shim": "^0.33.3",
    "reflect-metadata": "0.1.2",
    "rxjs": "5.0.0-beta.0",
    "zone.js": "0.5.10"
  },
  "devDependencies": {
    "lite-server": "^1.3.1"
  }
}
- To install the packages, select the package.json file in the Project Explorer, bring up the context menu by right-clicking it, and select [Run As]-[npm install] from the menu. This will download and install all packages by running the npm install command.
You’ll see a lot of warnings displayed in the console, but none should be cause for concern. That is par for the course and expected.
npm WARN package.json angular2@1.0.0 No repository field.
npm WARN engine rxjs@5.0.0-beta.0: wanted: {"npm":">=2.0.0"} (current: {"node":"0.10.34","npm":"1.4.28"})
npm WARN deprecated es6-module-loader@0.17.11: This project has been deprecated for "npm install es-module-loader" based on the newer loader spec.
npm WARN deprecated tough-cookie@2.2.2: ReDoS vulnerability parsing Set-Cookie https://nodesecurity.io/advisories/130
npm WARN engine hoek@2.16.3: wanted: {"node":">=0.10.40"} (current: {"node":"0.10.34","npm":"1.4.28"})
npm WARN engine cryptiles@2.0.5: wanted: {"node":">=0.10.40"} (current: {"node":"0.10.34","npm":"1.4.28"})
npm WARN engine boom@2.10.1: wanted: {"node":">=0.10.40"} (current: {"node":"0.10.34","npm":"1.4.28"})
npm WARN optional dep failed, continuing fsevents@1.0.14
- If you select your project in the Project Explorer and hit the F5 key (Refresh), you’ll see all of the downloaded packages under your project root:
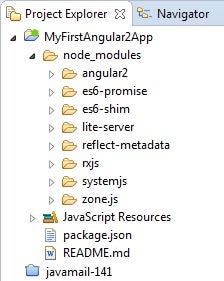
Now let’s take a moment and review the purpose of each of the packages that we just downloaded:
- lite-server: A Lightweight development node server for serving a web app, providing a fallback for the browser history API, loading in the browser, and injecting scripts on the fly.
- angular2: The Angular 2 library.
- systemjs: SystemJS is a module loader that can import modules at run-time in any of the popular formats used today (CommonJS, UMD, AMD, ES6). It’s built on top of the ES6 module loader polyfill.
- es6-promise: A lightweight npm library that provides tools for organizing asynchronous code.
- es6-shim: Another npm library that provides compatibility shims so that legacy JavaScript engines behave as closely as possible to ECMAScript 6.
- reflect-metadata: A polyfill for Metadata Reflection API. Provides decorators that add the ability to augment a class and its members as the class is defined, through a declarative syntax.
- rxjs: A Reactive Extensions Library for JavaScript. This is a rewrite of Reactive-Extensions/RxJS and is intended to supersede it once it’s ready.
- zone.js: Implements Zones for JavaScript, inspired by Dart. A Zone is an execution context that persists across asynchronous tasks. You can think of it as thread-local storage for JavaScript VMs. Currently, zones’ main purpose is to handle errors raised in asynchronously executed code.
Conclusion
With everything in place that our Angular 2 project requires, we are ready to begin coding our app. That will be covered in the next instalment. Stay tuned!
Rob Gravelle resides in Ottawa, Canada, and has been an IT guru for over 20 years. In that time, Rob has built systems for intelligence-related organizations such as Canada Border Services and various commercial businesses. In his spare time, Rob has become an accomplished music artist with several CDs and digital releases to his credit.


