Over the past couple years or so there has been a dramatic rise in the number of HTML5 games around on the Web, thanks in no small part to the HTML5 gaming engines that are making their development much easier.
In this tutorial, I’m going to show you how to build a simple space-based asteroids game using the Impact game engine, one of the more robust engines out at the moment.
Impact is a commercial engine, so you’ll need to purchase a license before you can use it, but that doesn’t stop you from at least following along with the tutorial to get a feel for how it works.
You’ll also need these game assets within the tutorial, so I suggest that you download them now if you plan to follow along.
Sometimes spending money is a good thing
Let’s get this out of the way; Impact isn’t free. If you’re anything like me, you’re probably a little disappointed with that statement. After all, we’re using open Web technologies here, so why charge for something that is built on top of free technology. Right? Well, to put it simply; the developer needs to make a living. On top of that, and probably most importantly; the Impact engine is an immensely solid and well documented engine. I’d even go as far as saying it’s the best HTML5 gaming engine that I’ve had the chance to play with to date, albeit not 100% perfect (what is?).
I’m entirely certain that the price of the engine is a reflection of the time and effort that has gone into constructing and supporting it. In short, if you can’t afford the $99 for a license, then I suggest you take a look at some of the free HTML5 gaming engines instead.
Overview of the Impact game engine
As I mentioned previously, Impact is a solid game engine that has obviously had a lot of time and effort put into its development. It runs on all the major browsers that support HTML5 canvas, as well as the iPhone, iPod Touch, and the iPad. In my eyes, what puts Impact head and shoulders above the competition is the thorough documentation, the tutorials, as well as the helpful support that can be accessed through the forums and IRC channel. Impact certainly has a feeling of overall quality about it that some of the other engines don’t have.
Impact has a whole host of functionality built in, like entities (objects within the game), physics, animations, user input, collision detection, audio, and even a full blown level editor (more on that in a moment). This is by no means a definitive list of what the engine can do, but I hope it at least sheds some light on how much of the tedious work it can take off your hands. This is helped by the way the engine has been constructed, using an object oriented approach, which allows you to effectively plug and play with new features in your game by extending on what’s already built in. It’s quick & easy and just what you want as a busy game developer.
The Weltmeister Level Editor is one of the crowning jewels of Impact, and is perhaps one of the most visually impressive features of the engine. This level editor is effectively a GUI that allows you to construct your game world, from simply designing the levels, to placing objects and defining how they interact with each other. It’s pretty impressive!
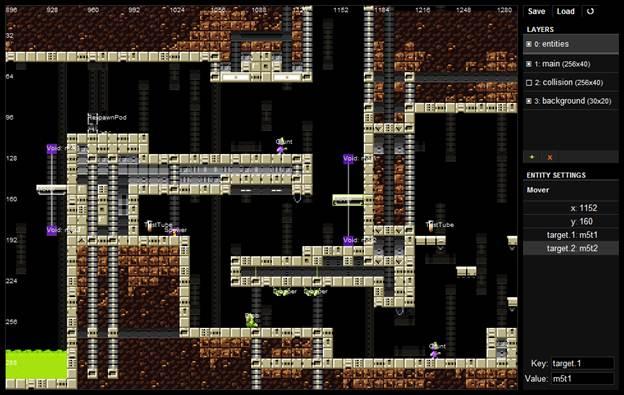
It’s important to point out that you won’t be using the Weltmeister Level Editor in this tutorial, as I want to teach you the raw code, but I’d recommend watching this video tutorial about the editor to get a feel for what it can do.
What you’ll be making
In this tutorial you’ll be making a simple space-based game in which you need to avoid the asteroids floating around. You’ll be leaving out features like audio and shooting for now, as they will just over-complicate matters for now, but rest assured that they are features that you can definitely add later in your own time without much hassle.
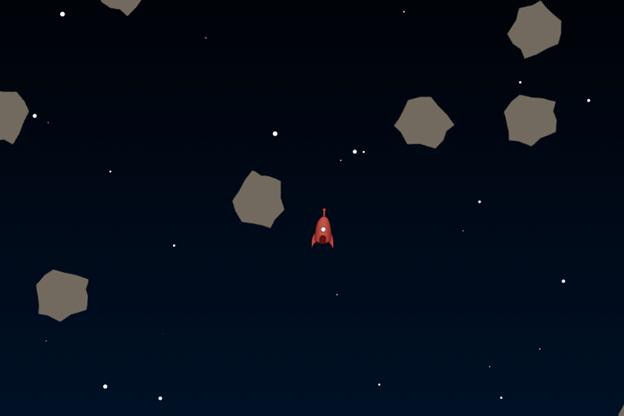
Why don’t you check out this video of the game in action?
Setting up Impact
Before you can get your hands dirty with the game you need to set up the Impact engine. It’s relatively painless, but I’m going to cover it in detail because it’s important to know what’s going on. I’d definitely check out the documentation page about setting up Impact for a much more in-depth walkthrough.
Using a domain for development
One of the major things to bear in mind when developing with Impact is that you need to be working on a Web server, and you need to access the game with a domain name. You can either use an online server, or a local development server through something like MAMP (Mac), WAMP (Windows), or XAMPP (cross-platform). This requirement is due to security issues in JavaScript and it’s nothing to do with the Impact engine.
Downloading and unpacking
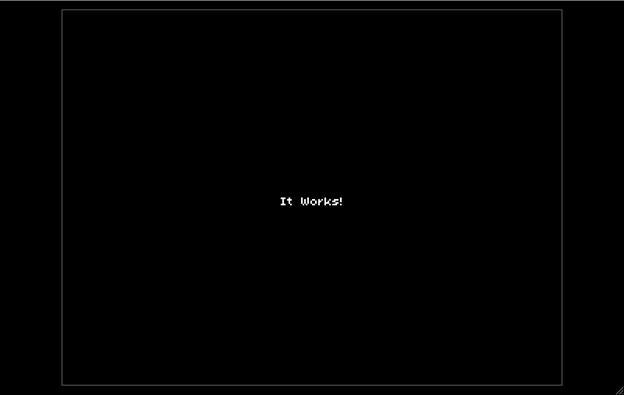
After you purchase Impact you’ll be sent an email with your personal download link and license key. I hope you keep it safe! This download link is tied to your account, so if you lose it you’ll have to get in touch with the developer to get it resent. The first steps are to download your personal copy of the engine, unpack the zip file, open up the impact folder, and move the files and folders inside to your Web server. You’ll know if all went well because you’ll see a message on the screen when you load the index.html file in your browser.
The files that you just copied are the core engine files (the lib/impact folder), as well as some example files that you’ll be using to create your game (the lib/game folder). The other files that you see are related to the Weltmeister Level Editor (the lib/weltmeister folder), as well as some tools to help when packing up the game for public release (the tools folder).
For the duration of this tutorial you need only worry about the lib/game folder, as well as the index.html file.
Setting up the HTML and CSS
The default HTML file uses inline CSS, so let’s perform some tweaks and move the CSS out into a separate file.
Open up index.html, remove everything, and add the following code:
-
<!DOCTYPE html>
-
<html>
-
<head>
-
<title>Impact Asteroids Game</title>
-
<meta charset=”utf-8″>
-
<link href=”game.css” rel=”stylesheet” type=”text/css”>
-
<script type=”text/javascript” src=”lib/impact/impact.js”></script>
-
<script type=”text/javascript” src=”lib/game/main.js”></script>
-
</head>
-
<body>
-
<canvas id=”gameCanvas”></canvas>
-
</body>
-
</html>
Next, create a new file called game.css and put it in the same direction as index.html. Add the following code within the CSS file:
-
* { margin: 0; padding: 0; }
-
html, body { height: 100%; width: 100%; }
-
canvas { display: block; }
-
body {
-
background: #000;
-
}
-
-
#gameCanvas {
-
height: 512px;
-
left: 50%;
-
margin: -256px 0 0 -384px;
-
position: relative;
-
top: 50%;
-
width: 768px;
-
}
All this does is provide a really basic CSS reset, as well as positioning the game centrally in the browser. Notice how you’ve set the width and height of the game within the CSS to a pretty specific size. I’ll explain why you chose those dimensions in a moment.
Setting up the main game file
If you refresh the browser you’ll notice all you see is a black background. This is because you just broke the game by fiddling with the HTML and changing the id of the canvas element. Whoops! Let’s sort that out.
First, open up the lib/game/main.js file, which is the main file for your game. I’ll explain what the various sections of this file do in a moment, but for now we just want to make a couple of changes to get that message back on your screen.
Find the call to ig.main at the end of the file and replace it with the following:
-
ig.main( “#gameCanvas”, MyGame, 60, 768, 512, 1 );
All that you’ve done here is change the first argument to point to the new id for the canvas element, the one that you changed before. Other changes have been made to the fourth and fifth arguments to reflect the new dimensions of the game, and also to the last argument to stop the game from being scaled to twice the size. You’re using specific dimensions because the engine is tile-based, and the tiles that you’re going to be using are mainly 64×64 pixels – 768 and 512 are just nicely divisible by 64, that’s all.
Check out the documentation for the ig.main function if you want to learn more about how it works.
If you refresh the browser window you should now get the previous message showing up again, although this time it should look a little smaller because you stopped the game from being scaled up.