


In this article we'll look at how to use CSS Positioning in a document. Essentially, there are three main ways of adding CSS to a document. These are: inline, embedded and external. In this article we'll be using the embedded method.

Positioning allows you to control how elements are positioned on a page, including positioning an element behind another. You can position elements with the following properties: top, bottom, left and right. Note that the position property has to be set for these elements to work properly.

There are four main positioning options: Absolute, fixed, relative and static.

Ÿ absolute: When this property is used, it's moved from the normal object flow and other objects will change position and will move into the space this object once occupied. The absolute class allows you to place the object in front of or behind other objects.

• fixed: The coordinates of this element use the browser window, so if the document is scrolled, the fixed objects don't scroll with it.

• relative: With the property, the coordinates of this document are based on the position it was in when the document is fully loaded.

• static: This is how all objects on a page are positioned by default and with this setting all objects are to remain in this position. The top, bottom, left and right properties don't apply to static objects.

Here's the code for an HTML5 document with text placed in an absolute and fixed position (note that I've added the color red to the <h2> text).

<!DOCTYPE HTML>
<html>
<head>
<meta charset="utf-8">
<title>Untitled Document</title>
<style>
h2
{
position:absolute;
left:50px;
top:35px;
color:red;
}

fixed
{
position:fixed;
top:100px;
left:50px;
}
</style>
</head>

<body>

<h2>This is text placed in an absolute position</h2>
<fixed>This is text in a fixed position</fixed>
</body>
</html>

Here’s what it looks like in Google Chrome.
Overlapping Elements

One option with element placement is when they overlap each other. When you use the z-index property, you can set the stack order, positively or negatively to place elements so they overlap each other.

Here's a code example which uses the above text and and an image.

<!DOCTYPE HTML>
<html>
<head>
<meta charset="utf-8">
<title>Untitled Document</title>
<style>
img
{
position:absolute;
left:50px;
top:50px;
z-index:-1;
}

h2
{
position:absolute;
left:60px;
top:25px;
color:blue;
}

fixed
{
position:fixed;
top:125px;
left:60px;
}

p
{
position:absolute;
left:60px;
top:140px;
}
</style>
</head>
<body>
<img src="htmlgoodieslogo.png" width="241" height="71" alt="">
<h2>This is text placed in an absolute position</h2>
<fixed>This is text in a fixed position</fixed>
<p>This image uses the absolute position and is placed 50 pixels<br>
 from the top and 50 pixels from the left with a z-index of -1, <br>
which moves the image behind the text.</p>


</body>
</html>
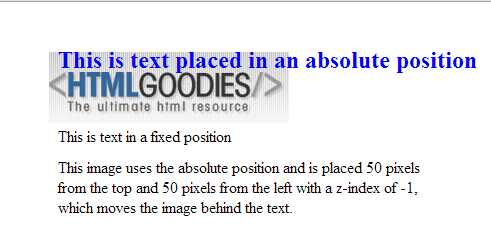
Here’s what it looks like in Google Chrome.
CSS Float
The next thing we’re going to look at is CSS Float property, which allows you to add elements to a layout and make other elements, like text, wrap around it. One major way that this is used is with images. Note that elements can only be floated left or right, not up and down.
Declaring a Float
With CSS Float, some of your options are: None, left, right and positioned.
• none: The box is not floated
• left: This element creates box that’s floated to the left and causes other elements will flow around it. To stop the floating, use the <br clear=’left’> tag. This will cause all the HTML after this tag to be placed under the floated object.
• right: This element creates box that’s floated to the right and causes other elements will flow around it. To stop the floating, use the <br clear=’right’> tag. This will cause all the HTML after this tag to be placed under the floated object.
• positioned: The box created is controlled by the positioning properties.
Here’s a simple sample of some code using the float property.
<!DOCTYPE HTML> <html> <head> <meta charset=”utf-8″> <title>CSS Floats</title> <style> img { float:right; } </style> </head> <body> <img src=”htmlgoodieslogo.png” >What you’re looking at is an example of the float:right style, a small sampling of what you can do with the float property. <br clear=’right’> </body> </html>

This is what the float looks like in actual practice.
CSS Thumbnails
In this section we’ll use CSS to control the positioning of thumbnail images on a page. This would be the precursor of building a gallery (though we’re not going to go into that much detail here).
Here’s the code:
<!DOCTYPE HTML> <html> <head> <meta charset="utf-8"> <title>Thumbnails</title> </head> <style> .img_thumbnail { float:left; width:150px; height:100px; margin:10px; } </style> <body> <h2>Thumbnail Gallery</h2> <img class="img_thumbnail" img src="imgs/wash1.png" width="150" height="100" > <img class="img_thumbnail" img src="imgs/wash2.png" width="150" height="100" > <img class="img_thumbnail" img src="imgs/wash3.png" width="150" height="100" > <img class="img_thumbnail" img src="imgs/wash4.png" width="150" height="100" > <img class="img_thumbnail" img src="imgs/wash5.png" width="150" height="100" > <img class="img_thumbnail" img src="imgs/wash6.png" width="150" height="100" > </body> </html>

And this is the finished gallery previewed in a browser. Note what happens when the browser isn’t wide enough to display all the images in one horizontal line.
Conclusion
In this article we looked at the basics of CSS positioning and CSS float. As you can see, we’ve only scratched the surface of what can be done with CSS. You’ll see many more tutorials as we explore how much control you have with CSS in your layouts.
For Further Reading: CSS Floats and Positioning Level 3
